Serverless Wordpress
This blog is completely serverless and in this post I will go through the steps, pros and cons to hosting and setting up a serverless blog yourself at a cost of $0 per month.
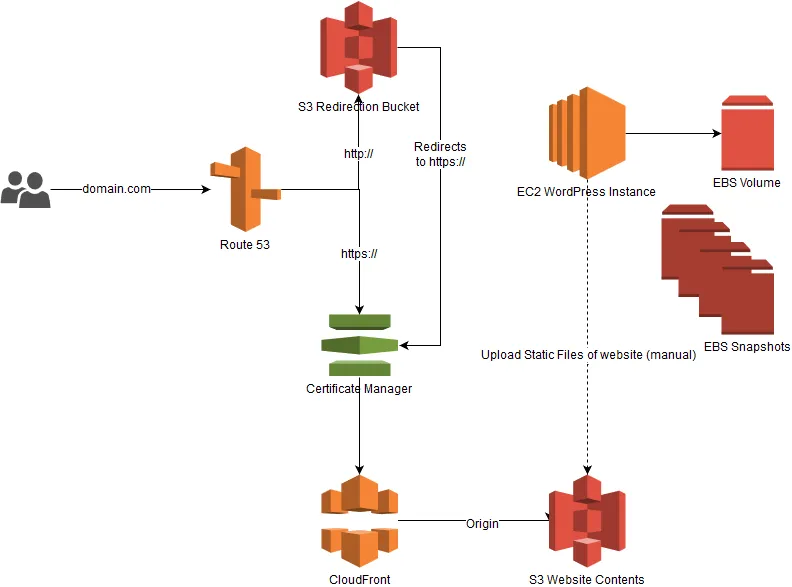
This blog runs completely on AWS, the static site is stored on S3 and then served with HTTPS through CloudFront. The WP Instance is a small EC2 instance that I manually start, write my blogs and then shutdown to save cost. When I want to publish a new blog, I use a WP plugin to crawl the site and create static files that is then downloaded as a ZIP file. On my local machine I run a GULP script that does some pre-deployment work and then uploads the files to S3 and invalidates the CloudFront CDN edge nodes.
#Beyond WordPress
The words serverless and wordpress, are not often used in the same sentence, but recently there have been great developments to create static serverless websites and still maintaining all the wordpress goodness. A great example is Shifter, they spin up a WordPress container that you can then use to write your blogs, pages and do all the other WordPress related magic. Then with a few clicks it crawls and creates a static website with all your posts, pages, etc and then deploys it to a CDN. Then there is also Gatsby, it uses the WP API to pull data out and then uses that to great your static site (not entirely sure how).
Then there is WP2Static, this is a plugin for WP and it essentially crawls your WP site and then generates all the static pages and hierarchy for you. It can then be downloaded as a zip file, deployed to S3 + Cloudfront, Netlify, Github pages and many more options.
That sounds great! So now you don’t have to worry about any security issues, updates to outdated plugins and scaling issues or capacity provisioning . Not everything is greener on the other side though, certain plugins that require your WP host to be online will not work. The default WP comments is an example, it posts back to your WP instance. This means that the default plugins for forms, comments, etc will not work. Fear not, third party to the rescue, for forms you can use Gravity Forms or even a plain old Google Form (saves a buck and just as effective). For comments consider Disqus, word is that their not too big on privacy and some complaints about adds on the free basic plan (have not experienced any of this first hand). So a great alternative among the thousands of commenting plugins out there, is CommentBox which just stood out for me.
#The Serverless Setup
Okay so enough about plugins and WP, let’s break the blog down into parts. DNS is handled by AWS Route 53, then we get the SSL Certificate for free (bonus) from Certificate Manager. After that we need to store our static HTML, CSS and JS pages somewhere, so we use AWS S3 as the origin, and then for the CDN and to enable HTTPS, we use AWS Cloudfront. When we are happy with the WP site, just go to the WP2Static Plugin page, fill in a few fields and then download the zip folder. This folder will then be uploaded to S3 and the CloudFront cache invalidated.
This sounds like a lot of extra steps than just using something like Shifter, so why DIY? Firstly because it has been a while since I have gone the whole Route 53, S3 and Cloudfront route, so it is good for experience. Secondly I liked the challenge of seeing just how cheap I can get this whole solution to work. Enough talk let’s get to the action.
Throughout the next section I am going to assume that you have basic knowledge of AWS and how the services work.

#Domain + SSL Certificate
Login to your AWS console. Go to Route53, Register Domain and then go through the steps, fill in your info and purchase. At the time of writing it is $12 for a .com domain, after purchasing the domain, AWS will verify your email and create your hosted zone. The Hosted Zone is where you manage your domains DNS records, it might take a while before it appears in your console. Below is a screenshot of what your zone will look like after this tutorial.

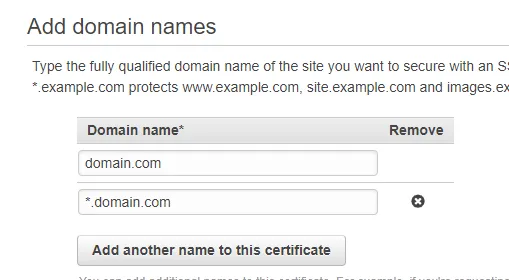
Next we need to create the SSL Certificate in the Certificate Manager. Important , make sure that you are in the N. Virginia (us-east-1) region when doing this step. Route53 is zone insensitive but Cloudfront is not, it needs the Certificate to be in this specific region. Okay, so go to Certificate Manager, Request a Certificate, Public Certificate, then specify a record for the domain and a second record that has as a wild card host name like so:
Then select DNS validation, Review and Request. Now AWS gives you the option to manually enter the DNS record in the Hosted Zone, or you can click the button that says: Add to Hosted Zone, give permissions if needed and your done. It might take a while for record to propagate, so be patient, this might take anything from 1 minute to max 1 hour.
#S3 Storage
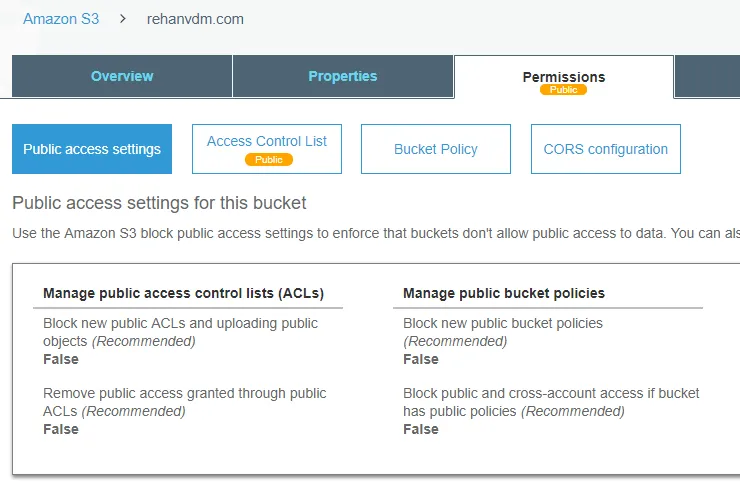
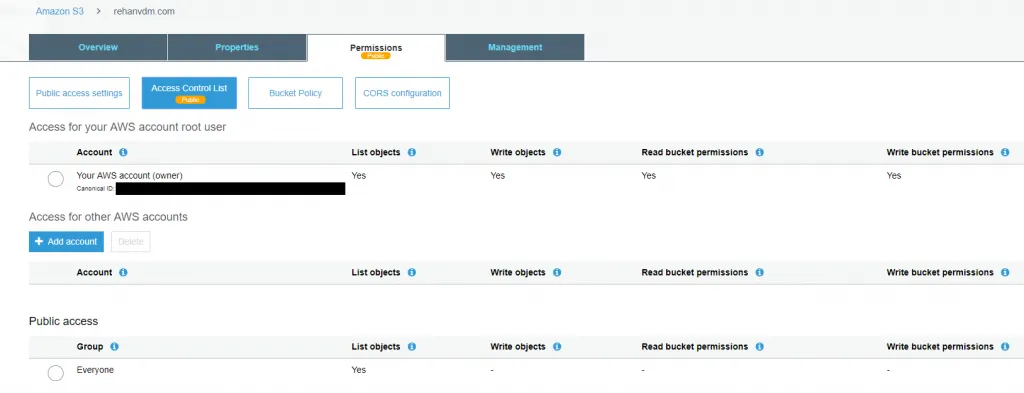
Now let’s setup our 2 S3 buckets. The first one will be the origin for the CloudFront(CF) Distribution and then the second one is a “hack” so that we can redirect our domain to CF as well. First create the origin bucket, I like to use the FQDN (Fully Qualified Domain Name) as the name, so for example: www.domain.com. Then make sure that the bucket has public read access, on both the Public access settings and Access control list as below
In all of the following images the 2 bucket names are switched in the pictures, I only later realized it and then just kept working with the error. So mentally switch the names for the buckets in all the picture (domain.com <=> www.domain.com)
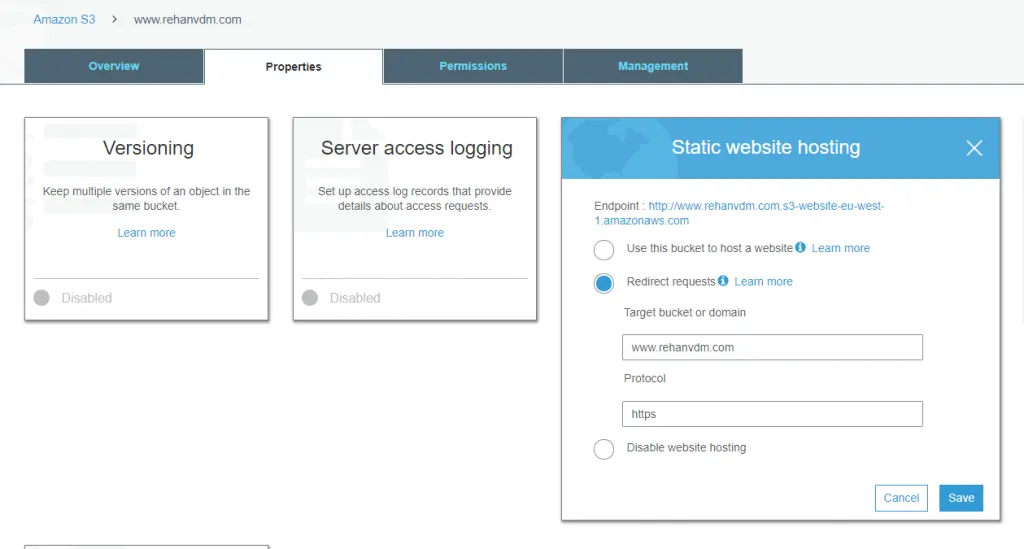
Then create the second bucket, with the domain name as the bucket name. Just use the default settings, no need for public even. Go to the bucket’s Properties and enable Static website hosting. Select Redirect requests and enter your FQDN (www.domain.com), select https as the protocol. We will set the Cloudfront distribution and DNS Routing up next.
#CloudFront CDN
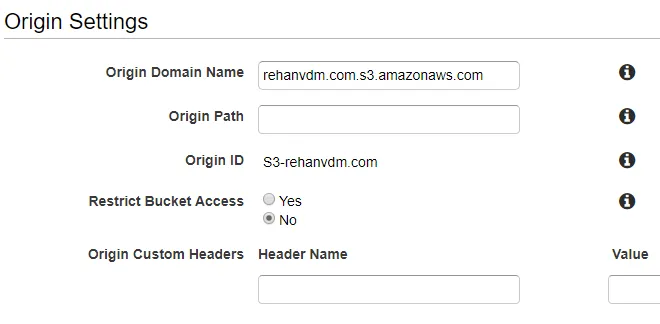
Now for the second last part, we need to create the CF (CloudFront) Distribution. Go to CloudFront, click Create Distribution, under the Web section click Get Started. This is a lengthy form, and I usually miss at least 1 setting and then have to go back and edit it later. For the Origin Settings, select the origin S3 bucket that we setup earlier (FQDN name, so www.domain.com), the Origin ID will be pre-filled, leave the rest of that section as is.
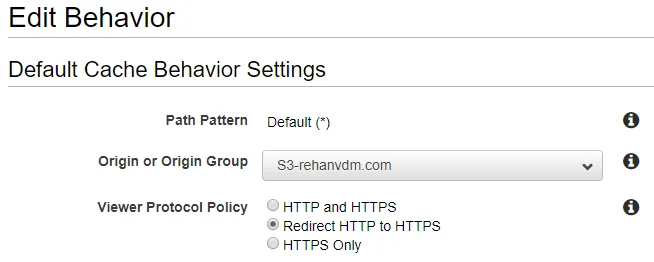
The pictures shown are after the CF Distribution has been created, where each section can be clicked on individually. So after your initial creation just validate that all of the fields are filled in correctly by editing/viewing each part.
Then for the Default Cache Behavior Settings section, select Redirect HTTP to HTTPS, then set Compress Object Automatically to Yes and then leave the rest as is.

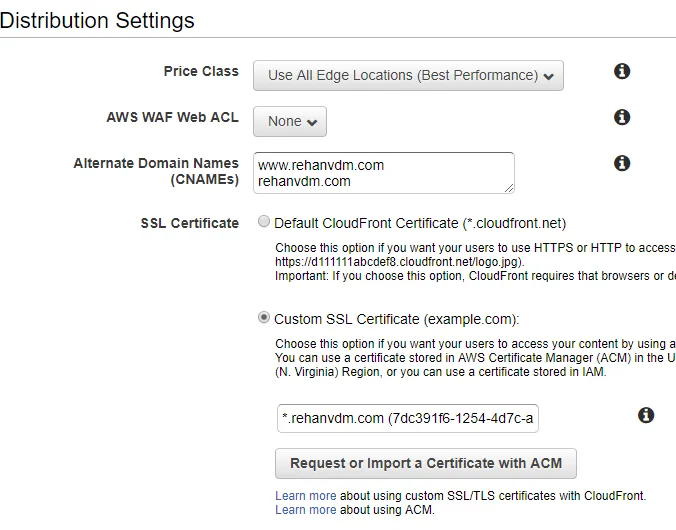
At the Distribution Settings section enter your FQDN and domain name in the alternate Domain Names (CNAMEs) field. Select the Custom SSL Certificate option, then your SSL Certificate will be available if you click on the text box, select it, and that is it.
It takes a while for a CF Distribution to be created, +- 40 mins. After that is done, take note of the domain name for the CF Distribution and head on over to Route 53.
#DNS with Route 53
Go to Route53 in the console, click on your hosted zone and then Create Record Set. On the left a pane opens, make the Name field the name of our host www, then choose the Type as A-IPv4 address and choose Alias, then select the Alias Target (AWS Service) that has the domain name of the CF Distribution we just created. Create the record, it has no TTL, but give it +- 3mins to propagate.
Those familiar with DNS, are probably saying that sounds invalid, and it is, that is because Alias DNS records is an extension to the way AWS handles DNS, it will allow us to do things normal CNAMEs can’t like route the zone apex (domain.com).
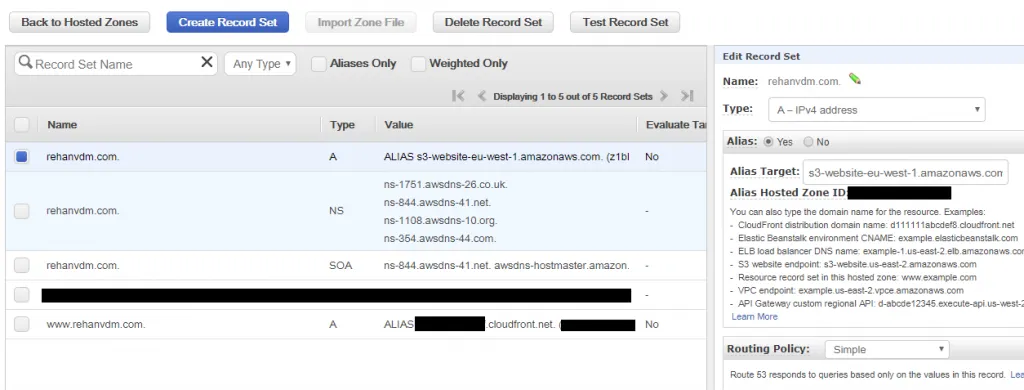
Then let’s create another Record Set, leave the name field blank (this is how we select the apex zone), also an A-IPv4 and Alias record. This time select the S3 Static Website Redirection bucket that we setup earlier, the bucket with the name: domain.com.
#Testing
That’s it, all done, what a train ride. Let’s test all of this by actually uploading a page to our site. Create a file called index.html, and put some basic contents in there, you can use the spinet below:
<!DOCTYPE html>
<html>
<body>
<h1>Cool, this actually worked</h1>
<p>It is a lot of setup though.</p>
</body>
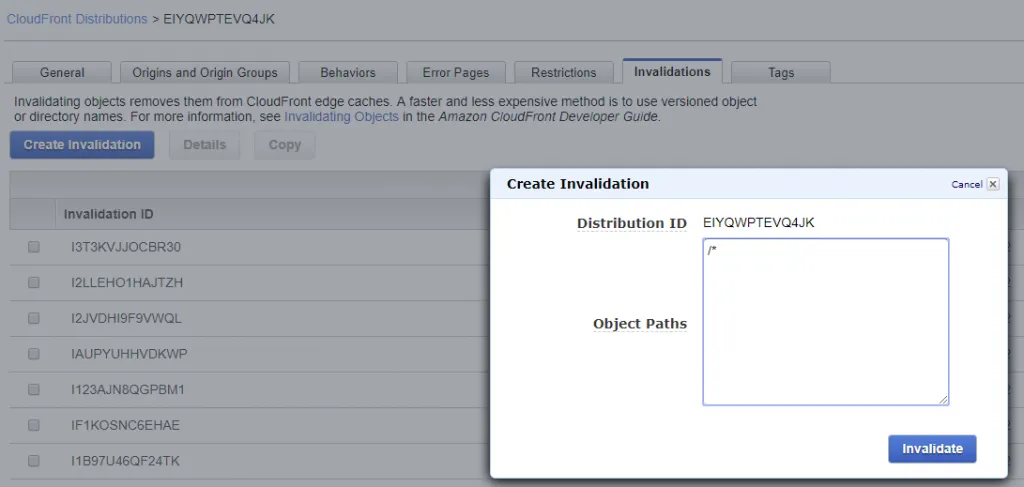
</html>Go to your S3 Origin bucket (www.domain.com) and then upload the index.html page. Now we need to invalidate the CF Distribution, this is how we flush (clear) the cache so that all the edge endpoints of the CDN know that they need to go fetch the latest content from our S3 origin bucket.
To do this go to your CF Distribution, then in the Invalidation tab, click Create Invalidation. For the Object Paths, type in: /* this invalidates everything in the cache. It will change from in progress to finished in a minute or so. Now navigate to your domain: https://www.domain.com and you should see the rendered HTML page.
#The WordPress Setup
That was the basic AWS side of a Serverless Blog, the WordPress side is nothing special and I am not going into detail about this. To run WordPress on AWS I used the Default Bitnami WordPress Image that runs on a t2.micro instance. Then when I want to write a blog I start the instance and when I am done, I stop it. I also have an Elastic IP (EI) attached to it, just so that the internal links and images stay alive for when I am writing blogs. I make snapshots every X amount of days of the whole EBS volume for backup purposes.
Then when I want to update the Blog content on my CF Distribution, I run the WP2Static Plugin to generate a ZIP file. I have a local GULP script that I run next, that extracts the contents, replace any URLs that might be left incorrect and then create 3 different copies, 1 for live, dev and a local environment. This is purely a visibility thing as I do not want to just upload content to a live environment before reviewing it. The GULP script also has a command to upload the content to S3 and the invalidate the CF Distribution using the AWS API. This is how I deploy the site, within a few clicks.
I would encourage you to rather use the already built in options of the WP2Static Plugin to deploy to S3 and CF, it does require a small once of purchase but it really is worth it. The only reason I am using the GULP script is because I am comfortable with it, I have many other static sites that I deploy this way and for the sake of visibility, to check the contents before uploading is also important to me.
Some of the WP magic I use on this blog:
- Static page generation : WP2Static
- Forms : Google Forms
- Comments : CommentBox.io
- SEO : All in One SEO
- Theme : A free one
#Conclusion
Currently the only expense is the EBS Backups that I make and the original domain purchase of $12. This blog does not have a lot of traffic yet and is running under $1 per month, actually we can say $0, since we are still within the free tier . I will update pricing estimates as soon as I can make them, I wanted to include some but turns out that even with the EC2 instance and all of the above setup, I am still far under the free-tier usage. So as soon as I can see cost in the AWS Service Explorer, I will provide an update.
#UPDATE: March
After running the site for 2 months, I realized that I was a bit naive to think it will cost 0$ as the EBS Volumes/Snapshots that you make does not fall within the free tier.
- EBS Volumes are: $0.10 per GB per month
- EBS Snapshots are: $0.05 per GB per month
I have a 20GB EBS for the instance so 1 Volume and 1 Snapshot costs me about $3. That is still pretty darn cheap for what you are getting, you can further reduce it by deleting the volume and then when you want to work just restore from the snapshot. Going even further WP has an import and export section, so it might be possible to export all your settings, destroy the volume completely and then when you wa