AWS IoT Coffee Monitor – Part 2
This is part 2 of 2 on building an AWS IoT Coffee Monitor. Part 1 can be found here
In Part 1 we looked at how to get our IoT data into the cloud. We connected our device, the ESP32, and successfully send the temperature of our cup of coffee to the cloud. Now we will store the data in DynamoDB, decide in what state our coffee is in, and if needed send Telegram Push notifications telling us to hurry up and get on with it (drink it before it is ice cold). Here is the architecture diagram again:

Prerequisites:
- Familiar with AWS
- Have Telegram installed on your phone
- Have the AWS SDK installed and configured
- AWS SAM installed (brief explanation provide further down)
A Telegram Bot is born
Creating a new Telegram bot is much easier than you might think. Open the app, search for BotFather then type /newbot give your bot a name and then a unique username. You will then get a congratulations message, click on the first link to start a chat with your bot and further down the message you will get a bot token. Keep a copy of this bot token as we will use it later on to send push notifications to this bot and our chat.

IaC and SAM
Infrastructure as Code, this concept involves describing and provisioning your environment which your code will live in. In the case of AWS this description is in the format of a Cloud Formation template. A Cloud Formation (CF) Template is just a YAML/JSON document that describes the resources that your code will use, this file is then checked in with your code.
These CF Templates then get deployed and become CF Stacks. There are numerous benefits in writing your applications this way. Some include that you can with a click of a button, destroy the application and all the resources it used, so you can kill it when you’re not using it. This CF Template can also be deployed in many regions and an update to the CF Stack can deploy changes to all them at the same time.
Since CF Templates are tedious to write, we will be using AWS Serverless Application Model, short for SAM. SAM is just an extra abstraction, to make it easier for us to write CF Templates, less code/lines. A SAM Template gets transformed to a CF Template and then deployed as a CF Stack. You can find out more about SAM here.
Then if this is your first time using SAM, you will need to follow the instructions to install it here. If your following along then you will have to create an S3 bucket which SAM will store the packaged CF Templates, I named my “rehan-sam-packages”, do this now.
We will be defining our resources and environment inside the template.yaml file, more about this later.
Then three commands are needed to get our application deployed and running on AWS:
- sam build
- sam packge
- sam deploy
These will be used later with extra parameters passed, mostly environment variables.
The CF Template
Complete code can be found here.
The environment fits into less than 150 lines of YAML. Let’s dissect the file. The first part is needed to tell CF how to correctly transform this SAM Template into a CF Template.
AWSTemplateFormatVersion: '2010-09-09'
Transform: AWS::Serverless-2016-10-31
Description: Coffee Monitor
Next we define the Environment parameters for our stack that will get passed in when we build and deploy it:
Parameters:
  AppName:
    Default: coffeemonitor
    Type: String
    Description: Name of app
  AppEnvironment:
    Type: String
    AllowedValues:
      - prod
    Description: Environment of this stack
  AppVersion:
      Type: String
      Description: Version of this stack in form of SemVer
  AppBuild:
      Type: String
      Description: Build number of this stack
  TelegramBotToken:
    Type: String
    Description: "The bot token received from botfather after using /newbot"
  TelegramBotChatId:
    Type: String
    Description: "Send: chat id?  to the bot, fill this in and then redeploy the stack"
  MaxTemp:
    Default: 50
    Type: String
    Description: The temperature which we use to determine that a coffee is at a good drinking temperature
  MinTemp:
      Default: 40
      Type: String
      Description: The temperature which we use to determine that a coffee is now cold
Noteworthy is the TelegramBotToken and the TelegramBotChatId environment variables that you will need to substitute with your own when deploying. The other fields are just for versioning purposes. The MinTemp and the MaxTemp is the values which are used to define the range in which we want our coffee to be in. The default optimal good drinking coffee for me is between 40°C and 50°C.
The MinTemp and the MaxTemp is the values which are used to define the range in which we want our coffee to be in
Then we have a Globals section where we say that all functions will have these values unless otherwise specified.
Globals:
    Function:
        Timeout: 12
        Environment:
          Variables:
            APPNAME: !Ref AppName
            ENVIRONMENT: !Ref AppEnvironment
            VERSION: !Ref AppVersion
            BUILD: !Ref AppBuild
        Tags:
            APPNAME: !Ref AppName
            ENVIRONMENT: !Ref AppEnvironment
            VERSION: !Ref AppVersion
            BUILD: !Ref AppBuild
In the Resource section below we begin defining our environment with the Lambda function that will listen to the IoT device, the ESP32.
Resources:
    CoffeeMonitorLambda:
        DependsOn: TelegramSNSTopic
        Type: AWS::Serverless::Function
        Properties:
            FunctionName: !Join ['', ['coffee-monitor-', !Ref AppEnvironment]]
            Runtime: nodejs8.10
            CodeUri: lambdas/coffee-monitor/
            Handler: app.handler
            Policies:
              - DynamoDBCrudPolicy:
                  TableName: !Join ['', ['coffee-monitor-', !Ref AppEnvironment]]
              - SNSPublishMessagePolicy:
                  TopicName: !GetAtt TelegramSNSTopic.TopicName
            Environment:
              Variables:
                SNS_TOPIC_TELEGRAM: !Ref TelegramSNSTopic
                TEMP_MAX: !Ref MaxTemp
                TEMP_MIN: !Ref MinTemp
            Events:
              IoT:
                Type: IoTRule
                Properties:
                  Sql: "SELECT * FROM 'coffee-monitor/#'"
                  AwsIotSqlVersion: '2016-03-23'
We specify our Lambda function to use NodeJS version 8.10, and tell it in which folder the code lies. Then we define policies, these allow access to other AWS resources, we specify that this lambda can do CRUD on the table named coffee-monito-prod where prod is the environment name passed in the parameters. We also specify that it is allowed to send messages to the TelegramSNS Topic that we define later.
Then the Events that trigger this Lambda is an IoT rule. SQL is used to select the data that gets send to this Lambda, here we say that all data from our coffee-monitor devices must go to this lambda. If we were just interested in 1 device location we would have made the from to be: coffee-monitor/home/#
Next we define our DynamoDB Table, where we will store our NoSQL data in. We define the Partition Key and Sort Key columns as well as the TTL column. This is DynamoDB’s internal mechanism to delete old data, if we provide a row with an expiration_ts timestamp attribute, then DynamoDB will automatically delete it for us when that time is reached. All time series data have an expiry date of 30 days for this project.
DynamoDBControlTable:
  Type: AWS::DynamoDB::Table
  Properties:
    TableName: !Join ['', ['coffee-monitor-', !Ref AppEnvironment]]
    KeySchema:
      - AttributeName: "PK"
        KeyType: "HASH"
      - AttributeName: "SK"
        KeyType: "RANGE"
    AttributeDefinitions:
      - AttributeName: "PK"
        AttributeType: "S"
      - AttributeName: "SK"
        AttributeType: "S"
    TimeToLiveSpecification:
      AttributeName: expiration_ts
      Enabled: true
    BillingMode: PAY_PER_REQUEST
Also note that our DynamoDB table is set to pay per request. Next we define our second lambda function, the Telegram Lambda. It will get triggered by 2 events. The first is by API, we need to set our Callback URL for our bot, so that when we reply to it, Telegram will send the replies to our URL, which will in turn send the data to this Lambda. When defining the API Path to be proxy and method any, all data that comes to this endpoint will be send to the Lambda function.
The second trigger event is the SNS Topic. Our first Lambda function will publish event messages (like new coffee) to the SNS Topic which this Lambda is subscribed to listen too. It will then take the message as is and send it to Telegram using HTTPS to be delivered to us as a Push notification.
ApiLambdaFunction:
   Type: AWS::Serverless::Function
   Properties:
     FunctionName: !Join ['', ['coffee-monitor-telegram-api-bot-', !Ref AppEnvironment]]
     Runtime: nodejs8.10
     CodeUri: lambdas/telegram-bot/
     Handler: app.handler
     Environment:
       Variables:
         TELEGRAM_BOT_TOKEN: !Ref TelegramBotToken
         TELEGRAM_BOT_CHAT_ID: !Ref TelegramBotChatId
     Events:
       ReceiveAPIRequest:
         Type: Api
         Properties:
           Path: /{proxy+}
           Method: ANY
           RestApiId: !Ref CoffeeMonitorApi
       SendSNSEvent:
           Type: SNS
           Properties:
             Topic: !Ref TelegramSNSTopic
We also pass extra Environment variables to this function that is needed to send the Push notifications. The last resources are the API Gateway and the SNS Topic that was referenced throughout.
CoffeeMonitorApi:
  Type: AWS::Serverless::Api
  Properties:
    Name: !Join ['', ['coffee-monitor-api-', !Ref AppEnvironment]]
    StageName: !Ref AppEnvironment

TelegramSNSTopic:
  Type: 'AWS::SNS::Topic'
  Properties:
    DisplayName: !Join ['', ['coffee-monitor-telegram-bot-', !Ref AppEnvironment]]

Lastly we define the Output section, which CF will produce when the Stack is deployed. It is usefull information that we can use.

Outputs:
    ApiURL:
      Description: "API Gateway endpoint URL"
      Value: !Sub "https://${CoffeeMonitorApi}.execute-api.${AWS::Region}.amazonaws.com/${AppEnvironment}/"
    RegisterTelegramBot:
      Description: "Navigate to the URL below to let your bot push to your API Endpoint"
      Value: !Sub "https://api.telegram.org/bot${TelegramBotToken}/setWebHook?url=https://${CoffeeMonitorApi}.execute-api.${AWS::Region}.amazonaws.com/${AppEnvironment}/bot_callback"
    TelegramSNSTopic:
      Description: "TelegramSNSTopic ARN"
      Value: !Ref TelegramSNSTopic
In this case it will output the API URL, a link that we can click to register this API Gateway URL as the callback for our bot (more about this in the Deploy section) and then for information purposes, the SNS Topic.
That’s it, these few lines completely describe our architecture diagram resources. Next let’s look at the important bits of code, then the deployment procedure.
Lambda Code – Coffee Monitor IoT
Complete code can be found here
First things first, all the Lambda code is wrapped in a try-catch-finally, it uses ES6 and native promises throughout. We switch on our incoming AWS IoT Core event, in which case we only have 2, the temperature and the button click. The switch does the appropriate code block for each, if it is the button click then it inserts a record into Dynamo DB and also notifies our SNS Topic.
module.exports.handler = async (event, context) =>
 {
     let response = null;
     try
     {
         let dtNow = moment().toISOString();
         switch (event.event_type)
         {
             case "button_click":
                 console.log("BUTTON 0 was pressed", event.click_no);
                 let expiration_ts_30_days = (Math.round(Date.now() / 1000) + (60 * 60 * 24 * 30));
                 await db_event.Insert(DynmaoDB_Events.EVENTS.BUTTON_CLICK, dtNow, event.click_no, expiration_ts_30_days);
                 await SendSNSNotification("Button Clicked: " +  event.click_no);
                 break;

             case "temp":
                 console.log("TEMP is", event.value);
                 await TempChange(event, dtNow);
                 break;

             default:
                 console.log(event);
                 break;
         }
         response = true;
     }
     catch (err)
     {
         console.error(err);
         response = false;
     }
     finally
     {
         //console.log("* Response: " + response)
         return response;
     }
 };
If it is a temperature event it will go to the TempChange function. The min and max temperature values are passed in using Environment variables, then we get the current state the coffee is in, the last temperature value and we also save the current temperature value. All 3 operations above are performed in parallel. We also handle fringe cases like if there is no previous state or temperature, indicating the table is empty.
Then we get to the interesting part, the State Machine determining when to trigger a change event. The following conditions trigger the states:
- New Coffee: Transition if the difference between this temperature and the previous is more than 5 degrees and state is in NO_COFFEE or COFFEE_GETTING_COLD
- Good Coffee: Transition if the temperature difference is going into the negative, indicating that it is cooling and if the temperature is between the min and max values as well as being in the NEW_COFFEE state.
- Getting Cold: Transition if the temperature is less than the min temp and if it is in the GOOD_TEMP state.
Each of these state changes sends a message to the SNS Telegram Topic and saves the current state in parallel.
async function TempChange(event, dtNow)
{
    let minTemp = process.env.TEMP_MIN;
    let maxTemp = process.env.TEMP_MAX;
    let temp = event.value;

    let expiration_ts_30_days = (Math.round(Date.now() / 1000) + (60 * 60 * 24 * 30));

    /* PARALLEL: Get Current State, Last Temperature and save Current Temperature */
    let [pState, pLastTemp, pSaveTemp] = [db_State.GetCurrentState(),
                                            db_event.GetLastTempValue(),
                                            db_event.Insert(DynmaoDB_Events.EVENTS.TEMP, dtNow, temp, expiration_ts_30_days)];
    let currentState = await pState;
    let prevTemp = await pLastTemp;
    await pSaveTemp;

    /* If no prev state, then means clean table, just insert a No Coffee state so that checking logic not fail */
    if(!currentState)
        await db_State.Insert(DynmaoDB_State.STATES.NO_COFFEE, dtNow, temp, expiration_ts_30_days);

    /* If no prev temp then return, need at least one value to make decision */
    if(!prevTemp)
        return;

    let tempDifFromPrev = (temp - prevTemp.Value);


    /* First state is special, it looks at the Prev value and then starts the StateMachine */
    if( tempDifFromPrev > 5
        && (currentState.StateValue === DynmaoDB_State.STATES.NO_COFFEE || currentState.StateValue === DynmaoDB_State.STATES.GETTING_COLD))
    {
        /* NEW COFFEE */
        console.log("** NEW COFFEE");
        let pNotify = SendSNSNotification("Coffee: ☕ NEW, temp: " + temp + " °C");
        let pNewState = db_State.Insert(DynmaoDB_State.STATES.NEW_COFFEE, dtNow, temp, expiration_ts_30_days);

        await pNotify;
        await pNewState;
    }
    else if( (tempDifFromPrev < 0)  /* Only if getting colder then check this */
        && temp > minTemp && temp <= maxTemp
        && currentState.StateValue === DynmaoDB_State.STATES.NEW_COFFEE)
    {
        /* DRINK IT NOW, GOOD COFFEE */
        console.log("** DRINK IT NOW, GOOD COFFEE");
        let pNotify = SendSNSNotification("Coffee: 👍 GOOD, temp: " + temp + " °C");
        let pNewState = db_State.Insert(DynmaoDB_State.STATES.GOOD_TEMP, dtNow, temp, expiration_ts_30_days);

        await pNotify;
        await pNewState;
    }
    else if(temp <= minTemp
        && currentState.StateValue === DynmaoDB_State.STATES.GOOD_TEMP)
    {
        /* GETTING COLD FAST, DRINK */
        console.log("** GETTING COLD FAST, DRINK");
        let pNotify = SendSNSNotification("Coffee: 👎 COLD, temp: " + temp + " °C");
        let pNewState = db_State.Insert(DynmaoDB_State.STATES.GETTING_COLD, dtNow, temp, expiration_ts_30_days);

        await pNotify;
        await pNewState;
    }
}
Lambda Code – API & SNS Telegram
Complete code can be found here
Much like the first Lambda, we have the try-catch-finally and then we decide what actions to take based on the incoming data. If it is from the API and the /bot_callback path, then we do the ReceiveNotification function, if any other path then we just reply with a HTTP Status code 200. Else if it is from the SNS topic that has subject SendNotification, we do the SendNotification function.
module.exports.handler = async (event, context) =>
{
    console.log(JSON.stringify(event));
    let response = null;

    try
    {
        if(event.resource === '/{proxy+}' && event.path === '/bot_callback') /* If receiving HTTP Request from Telegram callback */
            response = await ReceiveNotification(event);
        else if(event.resource === '/{proxy+}')  /* If receiving Any other HTTP Requests, just reply with default 200 */
            response =  { statusCode: 200, body: 'Thank you' };
        else if(event.Records && event.Records[0].Sns && event.Records[0].Sns.Subject === "SendNotification" )  /* If came from SNS topic */
            response = await SendNotification(event.Records[0].Sns.Message);

        return response;
    }
    catch (err)
    {
        console.error(err);
        response = false;
    }
    finally
    {
        console.log("* Response: " + response)
        return response;
    }
};
The ReceiveNotification is slightly interesting as this how we program our bot’s “intelligence”. If we send the text: chat id? To our bot, it will respond with the current chat id that we need later in the deployment steps. We also have another action that if we type Ping, it will respond with Pong, anything else it will not understand. We always return a 200 to the Telegram API.
async function ReceiveNotification(event)
{
    console.log(JSON.parse(event.body));

    let message = JSON.parse(event.body);

    let bot = new TelegramBot(process.env.TELEGRAM_BOT_TOKEN);
    switch (message.message.text.toLowerCase())
    {
        case "chat id?":
            await bot.Send("Your chat id is: "+message.message.from.id, message.message.from.id);
            break;

        case "ping":
            await bot.Send("Pong", process.env.TELEGRAM_BOT_CHAT_ID); //message.message.from.id);
            break;

        default:
            await bot.Send("Sorry, I don't understand that", process.env.TELEGRAM_BOT_CHAT_ID); //message.message.from.id);
            break;
    }

    return {
        statusCode: 200,
        body: 'Thank you'
    };
}
Lastly is the SendNotification function, it simply takes the SNS Message and sends it as is to us identified by our bot token and chat id.
async function SendNotification(event)
{
    let body = JSON.parse(event);
    let bot = new TelegramBot(process.env.TELEGRAM_BOT_TOKEN);
    await bot.Send(body.message, process.env.TELEGRAM_BOT_CHAT_ID);
    return true;
}
Data storage
Data is stored in a single DynamoDB table that is overloaded. In the Partition Key we store the name of the type of record we are storing, then the Sort Key is used as our identifier for that record. See example below, every time we write the temperature event, we write 2 records, the one for that date time and then we also put/update the current state.
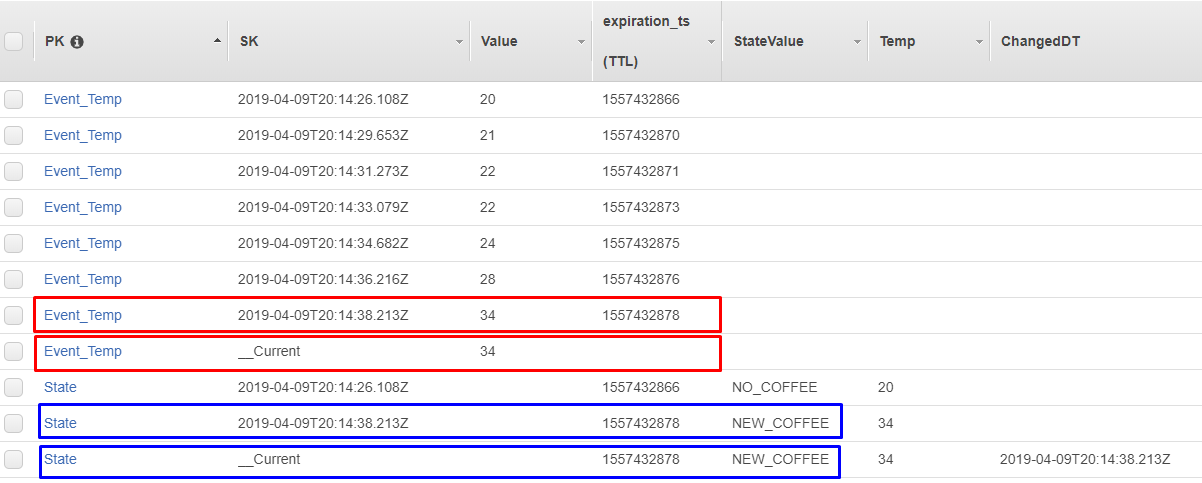
This way we have a history of all the temperature changes and we can do single lookup for the current temperature record without knowing the last date time value that was recorded. This saves us from doing overly complicated application logic or an expensive table scan.
Note that same pattern is used for state transitions, the history and current records are both written. Below is what the states in the table looks like after running an integration test simulating a coffee.

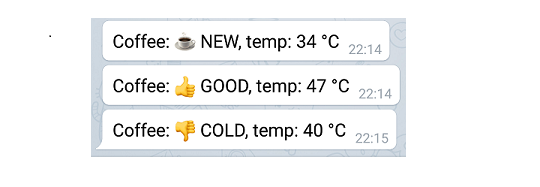
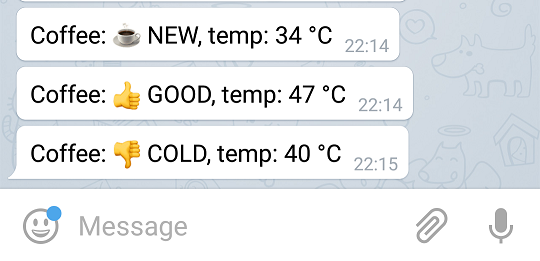 The telegram push notifications as received on my phone.
Deploying
To package and deploy the app we will use the SAM cli mentioned earlier. It is tedious to repeat the same long command lines, so since this is a node project we can make our lives easier by using npm scripts. These are defined inside the package.json as follows:

If we cd to the project root and run the command: npm run sam_deploy it will execute the 3 scripts above it with the SAM commands to build, package and deploy the application to CloudFront as a Stack. The blue parts are just the environment variables that we pass to the Parameters section in our SAM template. If you’re following along, this will be where you insert your bot token and chat id before deploying your stack.
To deploy successfully follow the instructions in this order:
- Use Telegrams BotFather to get a new bot and bot token
- Fill only the TelegramBotToken value in on the Environment Variables passed to our stack in the package.json file above.
- Then when the stack is deployed, go to the AWS console, Cloud Formation, click on the stack and view the outputs. There will be an output called RegisterTelegramBot click on it so that it registers our new API endpoint to receive all messages send to our bot. The API will then forward these messages to our Lambda.
- To find the chat id, send the following message to the bot: chat id? It will respond with your chat id.
- Open the package.json file again and fill the TelegramBotChatId in the environment variables as well. Redeploy the stack, and then you’re done. The Lambda function that receives the real time temperature values can now successfully send messages to your bot and chat.

Testing
A few basic tests are written to simulate events that trigger our Lambda functions, they can be viewed here. An interesting one is where we do an integration test to test a series of temperature values as they are send to our Coffee Monitor Lambda. A snippet of the test is below
Conclusion
This was a fun little weekend project powered by AWS, serverless and IaC (writing this post might have taken longer than the project though). Now I just need to be more attentive to the Notifications coming in (no solution for that) and hopefully, no more cold coffee for me 🙂
This is part 2 of 2 on building an AWS IoT Coffee Monitor. Part 1 can be found here


