👋 I'm Rehan!
I make things go fast with AWS & Serverless
Fueled by coffee, delivering value beyond code. I am an AWS Community Hero and just a guy who is a developer for fun.
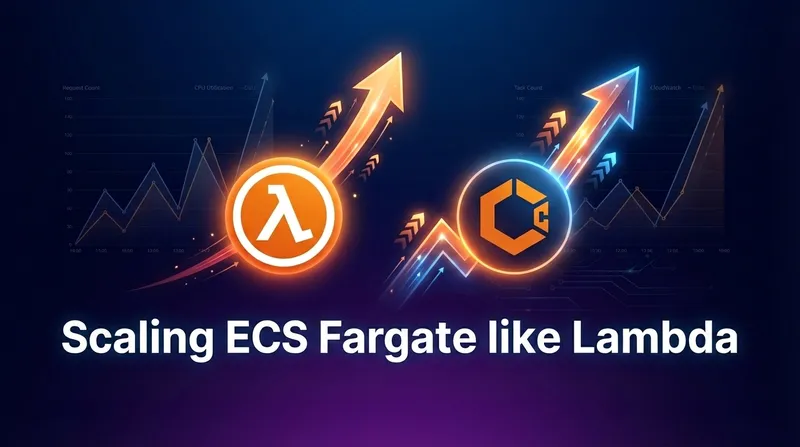
Scaling ECS Fargate like Lambda
In this post, we explore how fast ECS Fargate can scale compared to Lambda. We use a real world example of processing messages from an SQS queue.
◭ BlogAWSCDKServerlessECSFargate
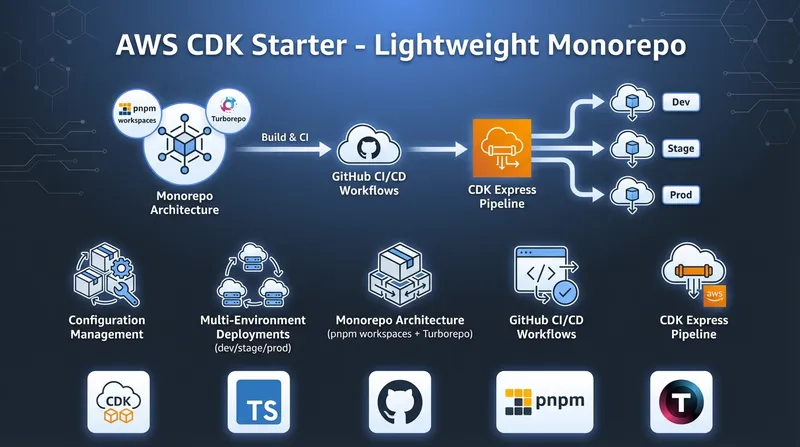
AWS CDK Starter - Lightweight Monorepo
The starter provides configuration management, multi environment deployments, monorepo architecture with pnpm & Turborepo and automated GitHub CI/CD workflows.
◭ BlogAWSCDKDevOpsGithub

Migrate from CDK Pipelines to CDK Express Pipeline
A practical guide to migrating from AWS CDK Pipelines to CDK Express Pipeline. Learn the reasons, benefits, and step-by-step process, with benchmarks and code comparisons.
◭ BlogAWSCDKDevOpsPipeline

CDK Express Pipeline Tutorial
Learn how to create and manage simple and fast deployment pipelines using the cdk-express-pipeline library, a powerful tool built on top of AWS CDK that enables CDK-native pipeline definitions.
◭ BlogAWSCDKDevOpsPipeline

CDK Constructs for connecting AWS Lambda to Tailscale
With the Tailscale Lambda Extension and Proxy CDK Constructs, you can simplify secure networking without having to rely on Docker and serverfull infrastructure
◭ BlogAWSCDKLambdaArchitectureServerless

Aurora DSQL - A NEW boring(?) AWS Serverless Postgres compatible database
Aurora DSQL is a serverless, distributed database with PostgreSQL compatibility. It's an OLTP database that can also handle OLAP workloads.
◭ ExternalAWSDSQLDatabaseServerless
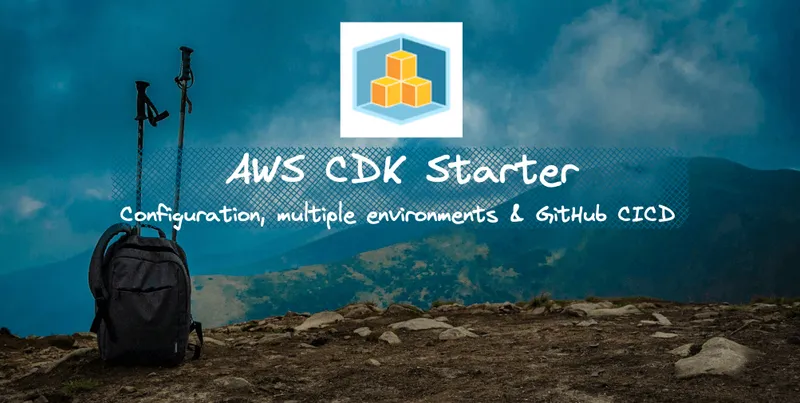
AWS CDK starter project - Configuration, multiple environments and GitHub CI/CD
The Starter Project shows how to do configuration management, design for multiple environments and use GitHub Workflows for CI/CD
◭ BlogAWSCDKDevOpsGithub
Should you use a Lambda Monolith, aka Lambdalith, for your API?
We explore the benefits of a Lambda Monolith for the API comparing it to single-purpose Lambda functions per API route.
◭ BlogAWSLambdaServerless
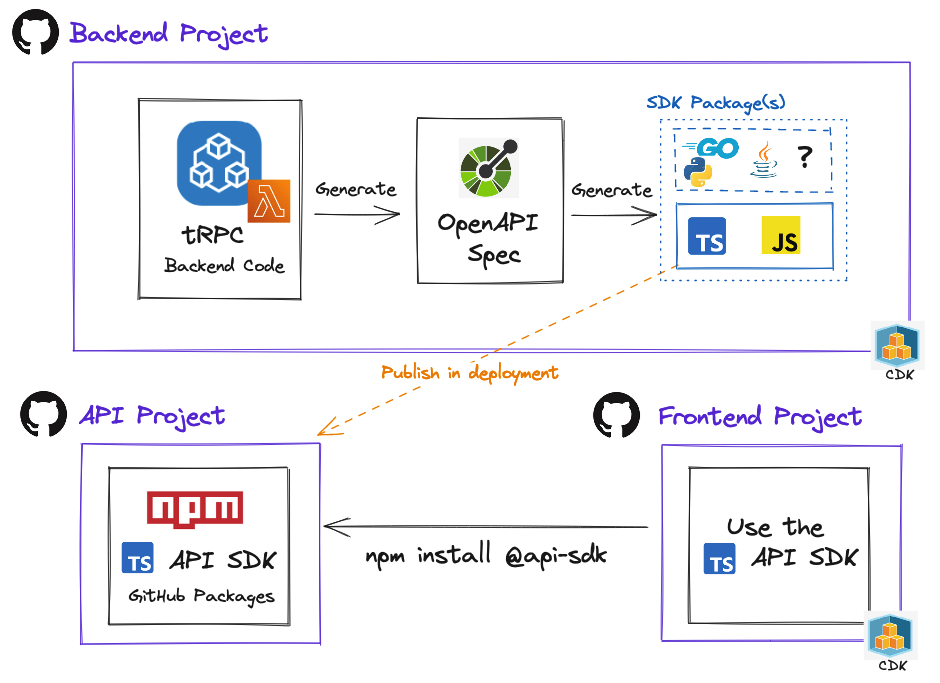
AWS Lambda with tRPC and separate repos using OpenAPI
We explore the available options of desired count and the correlation with respect to time on the circuit breaker that initiates cloudformation rollback
◭ ExternalAWSCDKLambdatRPC
CDK Shorts #3 – Local Bundling
By being a bit creative, we can force local bundling of CDK assets. This eliminates the need to run build scripts before CDK commands.
◭ BlogAWSCDK

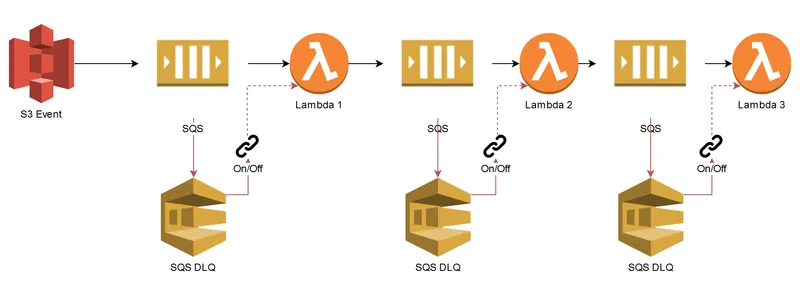
Deep dive on ECS desired count and circuit breaker rollback
We explore the available options of desired count and the correlation with respect to time on the circuit breaker that initiates CloudFormation rollback.
◭ ExternalAWSCDKECSCloudGlance

Port forwarding to private infrastructure with AWS SSM or SSH
We compare AWS SSM and SSH port forwarding to a remote host which includes code snippets
◭ ExternalAWSJSCloudGlance

Cloud Glance got rebranded
Cloud Glance got a face lift, a blog and some enhancements.
◭ JournalRetrospective
Cloud Glance's logo is generated by OpenAI's DALL-E
How to generate a logo using OpenAI's DALL-E for less than 1$
◭ ExternalAICloudGlance

How to get AWS credentials(temporary) for IAM User, Role and SSO with scripts
In the first installment of the 'How does CloudGlance Series', we look at some code snippets on how to get IAM User, Role and SSO temporary credentials with STS.
◭ ExternalCloudGlanceAWSJS

A slower month
The second month of Cloud Glance saw some new features, documentation and bug fixes.
◭ JournalRetrospective

The launch of Cloud Glance
The start of Cloud Glance and how it's going so far.
◭ JournalRetrospective

How not to start a side hustle on AWS
Slides about my talk at the AWS PTA Meetup. It covers both technical and soft skills required to create and run a side hustle on AWS. I will share some of my knowledge and experience on what it takes to side hustle.
◭ BlogSlidesArchitectureCDK
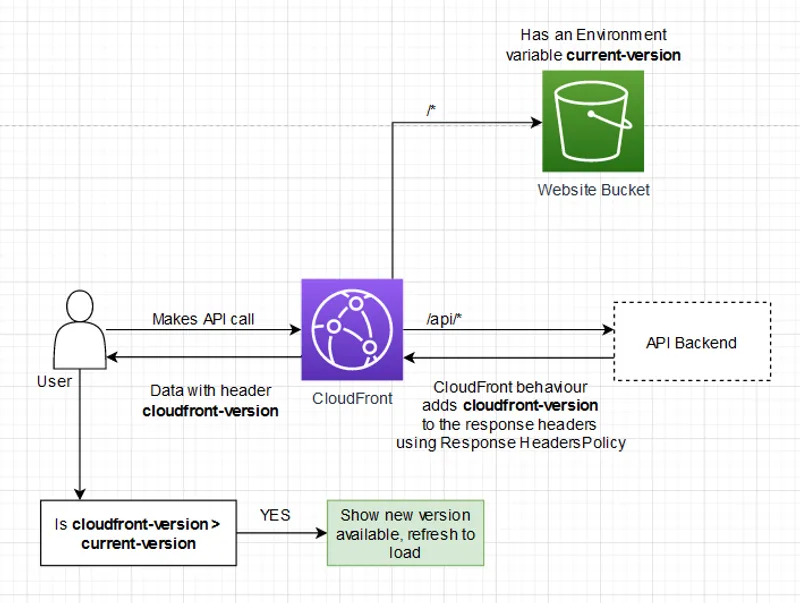
Using a CloudFront API Proxy to Invalidate a Single-Page Application Without Polling
Efficiently refresh your Single Page Application by piggybacking off your existing API calls using AWS Cloudfront reverse proxy and Response Header Policy
◭ BlogArchitectureCDK
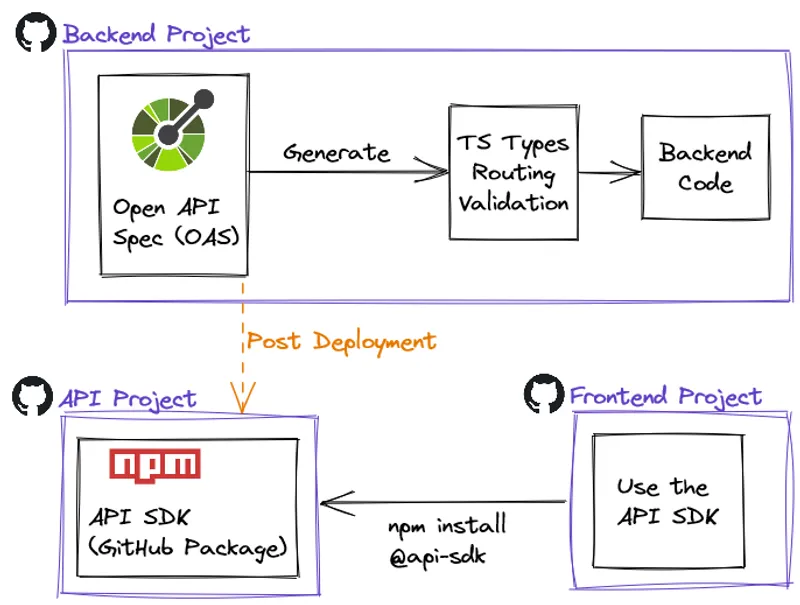
Improve DX by publishing an API SDK - a CDK Serverless example
Make the OpenAPI Spec file the contract between back and frontend by publishing an API SDK as an NPM package. Create visibility with automation by using Slack notifications when the backend pipeline publishes a new SDK.
◭ BlogArchitectureTypeScriptCDKAWSServerless +1
TypeScript Type Safety with AJV Standalone
TypeScript does a great job at compile time type safety, but we still need to do runtime checks just like in JavaScript. We focus on AJV Standalone that outputs compiled JS functions to be used at runtime. Going from TS Types to JSON Schema to JS functions allows us to validate TS Types where the other packages all work with classes and reflection.
◭ BlogArchitectureTypeScript

LRU cache fallback strategy
A Least Recently Used(LRU) cache stores items in-memory and evicts the oldest(less used) ones as soon as the allocated memory (or item count) has been reached. Storing data in-memory before reaching for an external cache increases speed and decrease the dependency on the external cache. It is also possible to fallback to in-memory caches like an LRU cache in periods that your external cache goes down without seeing a significant impact on performance.
◭ BlogArchitecture

2021 in Review
What I have been upto and where I am going next.
◭ JournalRetrospective

From monolith to resilient microservices
Slides about my talk at the Serverless Summit 2021. We will run a scenario on three types of monolithic architectures and then focus on how it is done with microservices. Amazon EventBridge and the Event Carried State Transfer pattern to create loosely coupled and independent services. This eliminates synchronous calls between services to increase system availability.
◭ BlogMicroservicesArchitectureSlides

Should you use microservices?
Use the right architecture for the job, consider the non-technical requirements first when deciding to use microservices.
◭ BlogMicroservicesArchitecture

Difficult choices
WarpURL hibernation, burnout(almost) and more thoughts on finding product market fit.
◭ JournalRetrospective
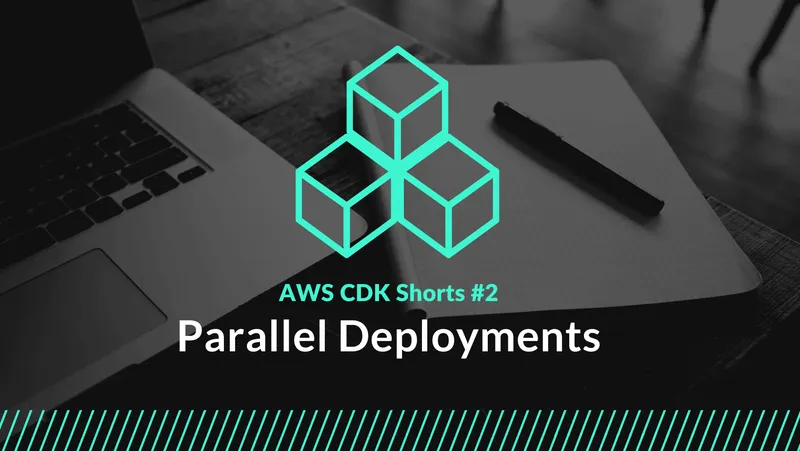
CDK Shorts #2 – Parallel Deployments
CDK stacks can be deployed in parallel by generating a cloud assembly output and then specifying the order explicitly.
◭ BlogAWSCDK

The importance of validating before building
Lessons on how important product market fit is for a successful business, but progress is still being made while having fun.
◭ JournalRetrospective

WarpURL Day 1!
This month was really exciting. I soft-launched WarpURL, shipped new features, fixed bugs,deployed API docs and wrote two blog posts for WarpURL.
◭ JournalRetrospective
CDK Shorts #1 – Consistent asset hashing (NodeJS)
Exploring intermittent “issues” with assets being non-deterministic; uploaded on every deploy, even if the source does not change.
◭ BlogAWSCDK

4 Methods to configure multiple environments in the AWS CDK
In this post I will explore 4 different methods that can be used to pass configuration values to the AWS CDK. We will first look at using the context variables in the cdk.json file, then move those same variables out to YAML files. The third method will read the exact same config via SDK(API) call from AWS SSM Parameter Store. The fourth and my favourite is a combination of two and three in conjunction with using GULP.js as a build tool.
◭ BlogAWSCDK

CloudFront reverse proxy API Gateway to prevent CORS
In this blog we will do a quick recap of CORS and reverse proxies. Then we will show how a reverse proxy can eliminate CORS, specifically in the context of a SPA hosted on CloudFront with an API Gateway backend. The sample code focuses on public, authenticated routes (Authorization header) and IAM signed request all being reverse proxied through CloudFront.
◭ BlogAWSServerlessCDK

Refactoring a distributed monolith to microservices
This article documents the thought process and steps involved in refactoring a distributed monolith to microservices. We are going to remove API GW, use Amazon Event Bridge and implement BASE consistency in the system to truly decouple our microservices.
◭ BlogAWSServerlessCDKMicroservicesArchitecture

AWS Serverless: you might not need third party monitoring
I hardly ever find myself reaching for third party monitoring services these days. I rather use the AWS native observability, monitoring and alerting services.
◭ BlogAWSServerlessCDK

An unexpected journey with Lambda & OracleDB
We create a Lambda layer with AWS CDK for the NodeJS Lambda function to consume; this consists of the Oracle Instant Client Basic Lite v19.x libs + the libaio.so.1 file. Developers will need to manually install these as dev dependencies.
◭ BlogAWSDatabasesServerlessLambdaCDK
Choosing the right Database on AWS
These presentation slides explore the benefits of managed VS self hosted databases, provide use cases and samples for: Amazon RDS, DynamoDB, AWS DocumentDB, ElasticCache, Neptune, Elastic Search, Timestream and QLDB
◭ BlogAWSDatabasesSlides
DynamoDB Importer
This blog will demonstrate the high throughput rate that DynamoDB can handle by writing 1 million records in 60 seconds with a single Lambda, that is approximately 17k writes per second. This is all done with less than 250 lines of code and less than 70 lines of CloudFormation.
◭ BlogAWSServerlessDynamoDBDatabasesLambda

3 Ways to Autoscale on AWS
In this article, we will be looking at three different methods of Autoscaling applications. We’ll also try to leverage AWS manged services as much as possible. We will look at Elastic Beanstalk, ECS Fargate and Lambda.
◭ BlogAWSAutoScalingContainersECS FargateLambda

13 AWS Lambda design considerations you need to know about – Part 1
With great power comes great responsibility. Serverless design requires knowledge of different services and how they interact with each other. Just like any other technology, there are some tricky waters to navigate, but they are far outweighed by the power of what serverless has to offer. To stop this dream from turning into a nightmare, here are a few things to keep in mind when designing with AWS Lambda.
◭ BlogAWSServerless
13 AWS Lambda design considerations you need to know about – Part 2
How to use the technical considerations we checked out in part one to effectively design serverless and Lambda systems.
◭ BlogAWSServerless

Data lakes are hard
In this post we will explore the implementation difficulties and how a data lake fits into the organization, topics that other articles might tend to oversee.
◭ BlogAWSAthenaBigData
Expanding EC2 disk space and adding monitoring with no down time
Whoops, your production server ran out of space. This is just a a quick guide on how to fix it without down time.
◭ BlogAWSEC2Ops
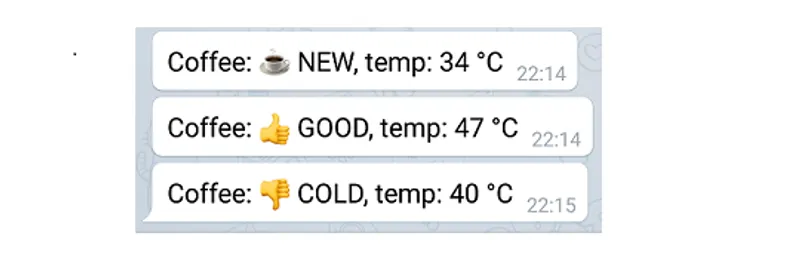
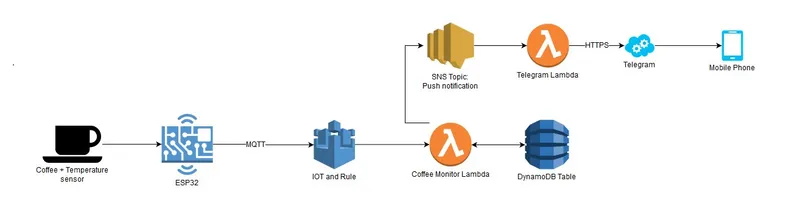
AWS IoT Coffee Monitor – Part 2
Using AWS IoT, DynamoDB, Lambda and Telegram Push Notifications to build a serverless Coffee Monitor notifying my coffee states, ex: Coffee is getting cold.
◭ BlogServerlessAWSLambdaDynamoDBNodeJS
AWS IoT Coffee Monitor – Part 1
Using AWS IoT, DynamoDB, Lambda and Telegram Push Notifications to build a serverless Coffee Monitor notifying my coffee states, ex: Coffee is getting cold.
◭ BlogServerlessAWSLambdaDynamoDBNodeJS
Debugging PHP with Xdebug, PHP Storm and AWS Elastic Beanstalk
A tutorial on how to setup Xdebug, PHP Storm and AWS Elastic Beanstalk to debug PHP applications
◭ BlogServerlessAWSPHP

Serverless Wordpress
This blog is completely serverless and in this post I will go through the steps, pros and cons to hosting and setting up a serverless blog yourself at a cost of $0 per month.
◭ BlogServerlessAWS
Staying in the loop
Keeping up to date with technology, frameworks and trends as a developer is difficult and fatiguing in this fast paced industry.
◭ BlogGeneral

Programmer Responsibilities
The work that you will be doing will echo your personality, believes, discipline, ideas and level of complexity long after it has been written. It is there for crucial to follow standards and practices that align with the company policy as the code you write is defining the company itself. This is a guide I wrote to ensure a consistent code base and principals.
◭ BlogGeneral